# NijeesWeb — complete documentation
> NijeesWeb is a no-code website and online store builder made in India. Businesses use it to design, publish and grow a fast, SEO-ready website or an online store on their own domain, with ready-made premium designs, free SSL and hosting in Mumbai, on yearly plans paid in rupees by UPI, card or net banking.
Key facts:
- Products: a no-code website builder and a no-code online store builder (software as a service), made in India
- Website: https://www.nijeesweb.com/ — website builder at https://www.nijeesweb.com/website, online store builder at https://www.nijeesweb.com/ecommerce
- Website plans (yearly, in Indian rupees, before GST): Single Page ₹4,199 (1 page, unlimited sections, 1 image gallery (up to 24 images), 1 video gallery (up to 6 videos), 1 GB storage); Up to 10 Pages ₹9,699 (10 pages, 5 image galleries, 50 images each, 3 video galleries, 3 GB storage); Up to 30 Pages ₹19,999 (30 pages, 15 image galleries, 100 images each, 10 video galleries, 10 GB storage, Mega menu)
- Website plans differ only in pages, image and video galleries, storage and the mega menu; every other feature is in every plan. Add-ons add pages, galleries or storage without changing plan
- Online store plans: yearly, in Indian rupees, bought on the store platform (https://www.nijees.in); see https://www.nijeesweb.com/pricing#stores
- Payment for plans: UPI, debit and credit cards, net banking, through PhonePe; plans never renew automatically
- Upgrades: any time; you pay only the difference for the days left in the year
- Hosting: Mumbai, India; free SSL certificate on your own domain
- Website builder: drag-and-drop rows, columns and 13 element types; tablet and phone adjustments; advanced styling and animation
- Website builder includes: starter website (Lumen, Meridian or Obsidian), design library, blog (Growth and Pro), forms with enquiries inbox, galleries, mega menus, footer builder
- Website SEO and AI search: server-rendered pages, per-page titles and descriptions, sitemap.xml, robots.txt, llms.txt and structured data for every customer site
- Online store builder: products with variants and stock; Razorpay, PhonePe, Cashfree, PayU, CCAvenue, Paytm, Stripe and PayPal; cash on delivery and bank transfer; weight-based shipping and Shiprocket; GST invoices, challans and labels; returns, exchanges and store credit; coupons; guest checkout
- Languages: multilingual websites and stores with their own URLs per language, machine translation, hreflang
- Support: email; documentation at https://www.nijeesweb.com/docs
---
# Website builder: Getting started
## What is NijeesWeb?
Source: https://www.nijeesweb.com/docs/website/getting-started/introduction
**NijeesWeb is a no-code website builder made in India.** You choose a plan, and NijeesWeb creates a complete, designer-made website on your own domain — with hosting in Mumbai and a free SSL certificate. You then change the words, pictures and colours in a drag-and-drop editor. No coding, no servers, no plug-ins.
### The two places you sign in
NijeesWeb has two separate sign-ins, and knowing which is which saves a lot of confusion:
| | Your **NijeesWeb account** | Your **website's admin panel** |
| --- | --- | --- |
| Address | `www.nijeesweb.com/account` | `yourdomain/admin` |
| What it is for | Buying plans, paying, renewing, upgrading | Building and editing your website |
| Who signs in | You, the customer | You and anyone you give the admin login to |
| Created when | You sign up | You set up a website (one admin login per website) |
One account can own several websites. Each website has its **own** admin panel, with its own login, at its own domain.
> [!TIP]
> Bookmark both addresses. The account is where you pay; the admin panel is where you work every day.
### How a website is put together
Everything you edit in the admin panel falls into a few building blocks:
- **Pages** — Home, About, Services and so on. Each page is built in the **page builder** from **rows**; a row holds one to six **columns**; a column holds **elements** such as headings, text, images, galleries, forms and buttons.
- **Header and footer** — shown on every page. They have their own screens: *Header Manager*, *Menu Links*, *Mega Menu* and *Footer Builder*.
- **Content libraries** — image galleries, video galleries, banners, testimonials, accordions (FAQs), blog posts and forms. You manage them in one place and show them on any page with an element.
- **Design** — your site-wide colours and fonts live in *Theme*. The *design library* has ready-made styles for buttons, forms, galleries and more.
- **Settings** — company name, logo, contact details, SEO defaults, WhatsApp button, cookie bar and spam protection.
### What NijeesWeb does for you automatically
You never have to think about:
- **Hosting and security** — your site runs on Amazon Web Services in Mumbai, over HTTPS, with a free SSL certificate that renews itself.
- **Speed** — pages are sent as complete HTML, images you upload are converted to WebP, and only the fonts your site actually uses are loaded.
- **The technical side of SEO** — a `sitemap.xml`, `robots.txt`, `llms.txt` (for AI assistants) and structured data are generated and kept up to date.
- **Phones and tablets** — every design adapts to smaller screens, and you can fine-tune each screen size.
### What you need before you start
1. **A domain name** — such as `yourbusiness.in`. Buy it from any domain registrar. NijeesWeb does not sell domains, so it stays fully yours.
2. **A way to pay** — UPI, a debit or credit card, or net banking.
3. **Your content** — logo, a few photos, and the words for your main pages. You can start with the sample content of your template and replace it as you go.
### Where to go next
Follow the *Getting started* guides in order — each one takes a few minutes:
1. [Create your account](https://www.nijeesweb.com/docs/website/getting-started/create-account)
2. [Choose a plan](https://www.nijeesweb.com/docs/website/getting-started/choose-a-plan)
3. [Set up your website](https://www.nijeesweb.com/docs/website/getting-started/set-up-your-website)
4. [Pay for your plan](https://www.nijeesweb.com/docs/website/getting-started/pay-for-your-plan)
5. [Connect your domain](https://www.nijeesweb.com/docs/website/getting-started/connect-your-domain)
6. [Sign in to your website](https://www.nijeesweb.com/docs/website/getting-started/first-sign-in)
## Create your NijeesWeb account
Source: https://www.nijeesweb.com/docs/website/getting-started/create-account
Your **NijeesWeb account** is where you buy plans, pay, renew and upgrade. Creating it is free and takes under a minute — you are not charged anything until you choose a plan.
### Sign up
1. Go to [www.nijeesweb.com/account/register](https://www.nijeesweb.com/account/register), or select **Start building** at the top of any page.
2. Fill in the form:
- **Full name** — your name, or your business's.
- **Email address** — you will sign in with this, and we send renewal reminders here.
- **Phone** *(optional)* — useful if our team needs to reach you about a payment.
- **Password** — at least 6 characters.
- **Confirm password** — type the same password again.
3. Select **Create account**.
You are signed in straight away and taken to your **dashboard**. If you arrived from the pricing page by choosing a plan, you go straight on to setting up that plan instead.

> [!TIP]
> Use an email address you check regularly, and one that will outlive any single employee — such as `owner@` or `info@` your business — rather than a personal address.
### Sign in later
Go to [www.nijeesweb.com/account/login](https://www.nijeesweb.com/account/login), or select **Sign in** at the top of any page, and enter the email and password you chose. Tick **Remember me** on your own computer to stay signed in.
### If something goes wrong
| What you see | What it means | What to do |
| --- | --- | --- |
| *The email has already been taken.* | An account with that email already exists. | [Sign in](https://www.nijeesweb.com/account/login) instead. If you have forgotten the password, [contact support](https://www.nijeesweb.com/contact?topic=support). |
| *The password confirmation does not match.* | The two password boxes are different. | Type the same password in both. |
| *The password must be at least 6 characters.* | The password is too short. | Choose a longer password. |
| *The spam check did not run* or a similar message | The reCAPTCHA check could not load, often because of an ad blocker. | Pause the ad blocker for nijeesweb.com, or try another browser. |
| *429 — Too Many Requests* | Too many attempts in a minute from your connection. | Wait one minute and try again. |
More fixes are in [Account sign-in problems](https://www.nijeesweb.com/docs/website/troubleshooting/account-sign-in).
### Your account and your website are different logins
Your account login (this page) is **not** the login for editing your website. Each website gets its own **admin login**, which you create when you [set up the website](https://www.nijeesweb.com/docs/website/getting-started/set-up-your-website). You can use the same email address for both.
## Choose a plan
Source: https://www.nijeesweb.com/docs/website/getting-started/choose-a-plan
Every plan gives you **one website for one year**, with hosting, a free SSL certificate, backups, updates and every tool in the builder. The plans differ only in **how much room** your website gets — pages, image and video galleries, storage — and whether it includes the **mega menu**.
### The plans at a glance
| | **Single Page** | **Up to 10 Pages** | **Up to 30 Pages** |
| --- | --- | --- | --- |
| Price a year | ₹4,199 + GST | ₹9,699 + GST | ₹19,999 + GST |
| Pages | 1 | 10 | 30 |
| Sections on each page | Unlimited | Unlimited | Unlimited |
| Image galleries | 1 | 5 | 15 |
| Images in each gallery | 24 | 50 | 100 |
| Video galleries | 1 | 3 | 10 |
| Videos in each gallery | 6 | Unlimited | Unlimited |
| Storage | 1 GB | 3 GB | 10 GB |
| Mega menu | — | — | ✓ |
Prices are in rupees, paid once a year. 18% GST is added at checkout and shown separately on your payment summary. Current prices are always on the [pricing page](https://www.nijeesweb.com/pricing).
**Every plan includes** the drag-and-drop builder, a complete starter website, the design library and website themes, the blog, contact forms with an enquiries inbox, site-wide and per-page SEO, AI-search files, as many languages as you need, the header manager and footer builder, custom code and custom files, your own domain, free SSL and hosting in Mumbai.
### How to choose
- **A single page** is enough for a café, a professional, an event or a small business that wants everything — story, services, photos, contact form — on one scrolling page. Sections on that page are unlimited.
- **Up to 10 pages** suits most businesses: a page for each service, a gallery, a blog and a contact page.
- **Up to 30 pages** suits larger organisations — schools, clinics with many departments, agencies — and is the plan with the **mega menu**, the large drop-down menu with columns and pictures (Up to 30 Pages).
> [!TIP]
> Not sure? Start smaller. If you later need a few more pages or more storage, an [add-on](https://www.nijeesweb.com/docs/website/account-billing/add-ons) adds exactly that without changing plan. And you can [upgrade at any time](https://www.nijeesweb.com/docs/website/account-billing/upgrade-your-plan), paying only the difference for the days left in your year.
### Add-ons
Add-ons give a website more room than its plan, for a yearly price. Bought during the year, an add-on costs only the days left until the website's renewal date, and then renews with the plan.
- **+5 pages** — ₹1,499 a year + GST. Five more pages for your website.
- **+2 GB storage** — ₹599 a year + GST. Two more gigabytes for images, videos and files.
- **+1 image gallery** — ₹599 a year + GST. One more image gallery, as large as your plan's galleries.
See [Add-ons](https://www.nijeesweb.com/docs/website/account-billing/add-ons).
### Choose your plan
1. Sign in to your [account](https://www.nijeesweb.com/account/login).
2. On your **dashboard**, scroll to **Choose a plan** — or open **Plans** in the menu on the left.
3. Select **Choose** on the plan you want.

Next you [set up your website](https://www.nijeesweb.com/docs/website/getting-started/set-up-your-website).
### Good to know
- **One plan = one website.** To run two websites, buy two plans. They are managed from the same account. See [More than one website](https://www.nijeesweb.com/docs/website/account-billing/more-than-one-website).
- **The single-page plan gets a whole starter site too.** Its pages arrive as sections of your one page, and the menu jumps to each of them. See [Set up your website](https://www.nijeesweb.com/docs/website/getting-started/set-up-your-website).
- **Limits never delete anything.** At a limit you just cannot add more of that thing until you make room or get more. If a website ever holds more than its plan allows, the extra ones are switched off until there is room — see [When your website is over a limit](https://www.nijeesweb.com/docs/website/reference/limits-and-file-types#when-your-website-is-over-a-limit).
- **No automatic renewal.** Nothing is ever charged without you choosing to pay.
- **No free plan or trial** at the moment — but your account is free, and the [templates](https://www.nijeesweb.com/website/templates) and these docs are open to everyone.
## Set up your website
Source: https://www.nijeesweb.com/docs/website/getting-started/set-up-your-website
After you choose a plan, the **Set up your website** page asks for the few details we need to create your website. Everything except the domain and website ID can be changed later.

### Website ID
A short internal name for your website, such as `sharma-dental`. Visitors never see it; it identifies your website in our systems and in conversations with support.
- Use only **letters, numbers, dots (.), dashes (-) and underscores (_)** — no spaces.
- Up to 60 characters.
- It must be unique across NijeesWeb, so a generic word like `shop` may already be taken.
> [!WARNING]
> The website ID cannot be changed after you pay. Pick something that will still make sense in a few years.
### Website domain
The address visitors will type to reach you, such as `sharmadental.in`.
- Type the **bare domain**: no `http://`, no `https://`, no `www.` and no slash at the end.
- You must already **own** the domain. Buy it from any domain registrar first.
- A subdomain such as `book.sharmadental.in` also works.
Right after paying, you will [connect the domain](https://www.nijeesweb.com/docs/website/getting-started/connect-your-domain) by pointing it to `13.202.27.61`. You can do that before paying too — it does no harm.
### Your starting site
Choose what your website looks like on day one:
- **Ready-made site** *(selected by default)* — the complete designer-made website that comes with your plan: **Lumen** with the smallest plan, **Meridian** with the middle one, **Obsidian** with the largest. Every page, image, menu and contact form is already in place.
- **A website theme** — any complete theme from the NijeesWeb library that your plan includes, shown by name with the label *Website theme*.
- **Blank site** — one empty page with no styling, for people who want to build everything from scratch.
Nothing here is permanent. You can change every word, image and colour afterwards, and install other themes later from the admin panel. See [Templates](https://www.nijeesweb.com/website/templates) to preview the designs.
> [!NOTE]
> **On a one-page plan, you still get the whole site.** A plan that allows a single page installs the ready-made site — or a website theme — on that one page: the home page first, then the other pages as sections below it (*About*, *Services*, *Gallery*, *Contact*…). The menu and buttons jump to each section, and the gallery and contact form work as usual. If you later add pages with an [add-on](https://www.nijeesweb.com/docs/website/account-billing/add-ons) or a bigger plan, you can move sections onto their own pages.
### Website admin account
This is the login for your website's **admin panel** — where you edit the site. It is separate from your NijeesWeb account.
- **Admin name** — shown in the admin panel. Pre-filled with your account name.
- **Admin email** — you sign in to your website with this. Pre-filled with your account email.
- **Admin password** and **Confirm admin password** — at least 6 characters, typed the same in both boxes.
> [!TIP]
> Save this password in your password manager now. It is the key to editing your website, and it is not the same as your account password unless you choose it to be.
### Pay and activate
Check the plan summary on the right, then select **Pay & activate**. You are taken to PhonePe's secure checkout — see [Pay for your plan](https://www.nijeesweb.com/docs/website/getting-started/pay-for-your-plan).
### If the form shows an error
| Message | Fix |
| --- | --- |
| *The website ID may only contain letters, numbers, dots, dashes and underscores.* | Remove spaces and other symbols. |
| *The tenant id has already been taken.* | Someone already uses that ID — add something unique, like your city. |
| *Enter a bare domain such as mystore.example.com (no http:// and no trailing slash).* | Delete `http://`, `https://` and any `/` at the end. |
| *That domain (or its www. alias) is already in use.* | That domain already has a NijeesWeb website. If it is yours, renew or upgrade it from your dashboard instead. |
| *That domain is reserved.* | You entered a NijeesWeb address. Use your own domain. |
| *The password confirmation does not match.* | Type the same admin password in both boxes. |
| *You have reached your limit of … websites.* | Your account's website allowance is used up — [contact support](https://www.nijeesweb.com/contact?topic=plans) to raise it. |
All of these are explained in more detail in [Set-up form errors](https://www.nijeesweb.com/docs/website/troubleshooting/set-up-form-errors).
## Pay for your plan
Source: https://www.nijeesweb.com/docs/website/getting-started/pay-for-your-plan
When you select **Pay & activate** on the set-up page, you are taken to **PhonePe's secure checkout**. NijeesWeb never sees your card, UPI or bank details — you enter them on PhonePe's page.
### Ways to pay
- **UPI** — scan the QR code or pay to your UPI ID from any UPI app: PhonePe, Google Pay, Paytm, BHIM, your bank's app.
- **Debit or credit card** — Visa, Mastercard, RuPay and others your bank supports.
- **Net banking** — from most Indian banks.
The amount is shown in rupees before you pay. For an [upgrade](https://www.nijeesweb.com/docs/website/account-billing/upgrade-your-plan) it is only the difference for the days left in your year, not the full price.
### Step by step
1. On the set-up page, select **Pay & activate**.
2. On PhonePe's page, choose how to pay and complete the payment, including any OTP or UPI PIN your bank asks for.
3. **Do not close the window** until you are sent back to NijeesWeb. It takes a few seconds.
4. You land on one of the result screens below.
> [!NOTE]
> The checkout link is valid for 15 minutes. If you take longer, simply start again from your dashboard — nothing is charged for an expired checkout.
### What each result means
#### "You're all set!"
The payment succeeded. Your website has been created and the screen shows the domain it is being set up at, plus a **reference** for your records. Select **Go to dashboard** — your new website is listed there with its renewal date.
**Next:** [connect your domain](https://www.nijeesweb.com/docs/website/getting-started/connect-your-domain) if you have not already, then [sign in to your website](https://www.nijeesweb.com/docs/website/getting-started/first-sign-in).
#### "The payment did not go through. You have not been charged."
The payment failed or was cancelled — at PhonePe, at your bank, or because you closed the page. No money was taken. Go back to **Plans** and try again, perhaps with a different payment method.
#### "Your payment is still pending…"
Your bank has not yet confirmed the payment to PhonePe. This usually resolves within minutes. **Do not pay again.** If the money has left your account, your website is created automatically as soon as the payment is confirmed — check your dashboard after a little while.
#### "We could not start the payment. Nothing has been charged."
The checkout could not be opened. Wait a minute and try again. If it keeps happening, [tell us](https://www.nijeesweb.com/contact?topic=billing).
#### "Your payment went through but we could not finish setting up the website."
Rare, and fixed by our team: your payment is safe and we have been alerted automatically. [Contact support](https://www.nijeesweb.com/contact?topic=billing) with the reference shown on the screen and we will finish the set-up for you.
### Receipts
PhonePe sends you a payment confirmation, and your bank or UPI app shows the transaction. Each payment also has a NijeesWeb reference (shown on the success screen) — quote it whenever you contact us about a payment.
### Money left my account but I see no website
1. Check your [dashboard](https://www.nijeesweb.com/account/dashboard) — the website may already be there.
2. If the status was *pending*, wait up to an hour; confirmation can be delayed by the bank.
3. Still nothing? [Contact support](https://www.nijeesweb.com/contact?topic=billing) with the date, the amount and your UPI or card reference. If a payment was taken and no website created, it is refunded in full — see the [refund policy](https://www.nijeesweb.com/refund-policy).
## Connect your domain
Source: https://www.nijeesweb.com/docs/website/getting-started/connect-your-domain
Your website runs on NijeesWeb's servers, but your domain is registered somewhere else — with GoDaddy, Hostinger, BigRock, Namecheap or another registrar. **Connecting** the two means adding two DNS records at your registrar so that your domain points to us. It takes about five minutes.
> [!IMPORTANT]
> **Do this as soon as you have paid — or even before.** Your free SSL certificate is issued automatically in the first two hours after your website is created. If your domain starts pointing to us later than that, the site will work but without the padlock until we issue the certificate — [contact support](https://www.nijeesweb.com/contact?topic=domain) and we will do it for you.
### The records to add
Add these two records in your domain's DNS settings:
| Type | Name / Host | Value / Points to | TTL |
| --- | --- | --- | --- |
| A | `@` | `13.202.27.61` | Automatic (or 1 hour) |
| A | `www` | `13.202.27.61` | Automatic (or 1 hour) |
- **`@`** means the domain itself (`yourbusiness.in`). Some registrars want the field left blank, or the full domain typed in, instead of `@`.
- **`www`** covers `www.yourbusiness.in`. Your site answers on both addresses, and one redirects to the other so search engines see a single site.
Then **delete any other records with the same names** that point elsewhere — another `A` record for `@` or `www`, an `AAAA` record (an IPv6 address), or a `CNAME` on `www`. Old records are the most common reason a domain keeps showing the previous website or a parking page.
> [!NOTE]
> Do not change your **MX** records. They handle your email, and your email keeps working exactly as before.
### Step by step at your registrar
The screens differ from one registrar to another, but the steps are always the same:
1. Sign in to the website where you bought your domain.
2. Open your list of domains and choose the one you used for NijeesWeb.
3. Find **DNS**, **DNS management**, **Manage DNS** or **Zone editor**.
4. Edit the existing `A` record for `@` — or add one — and set its value to `13.202.27.61`.
5. Do the same for `www`. If `www` is a `CNAME`, delete it and add an `A` record instead.
6. Save. That's it — the rest happens on its own.
#### Tips for popular registrars
- **GoDaddy** — *My Products → Domains → DNS*. GoDaddy adds a parking `A` record for `@` to new domains: edit that record rather than adding a second one.
- **Hostinger** — *Domains → Manage → DNS / Nameservers*. If the domain uses Hostinger's nameservers, edit the records there; if it shows other nameservers, edit the records wherever those nameservers are managed.
- **BigRock** and **ResellerClub** — *Manage Domain → DNS Management*. Make sure the domain uses the registrar's own nameservers, or the records you add will not take effect.
- **Namecheap** — *Domain List → Manage → Advanced DNS*. Remove the *URL Redirect Record* and *CNAME* for `www` that Namecheap adds by default.
- **Cloudflare** — add both `A` records and set them to **DNS only** (grey cloud), not *Proxied* (orange cloud), at least until your SSL certificate has been issued.
### How long it takes
DNS changes usually spread across the internet within **15 minutes to a few hours**, and occasionally up to 48 hours. Until then, some visitors may still see your old site — that is normal.
As soon as your domain points to NijeesWeb, the SSL certificate is issued automatically and your site opens over **https://** with a padlock.
### Check that it worked
- Open `https://yourbusiness.in` in a private browser window. You should see your new website with a padlock in the address bar.
- Or look the domain up on a DNS checker, such as [dnschecker.org](https://dnschecker.org): type your domain, choose **A**, and you should see `13.202.27.61` in most locations.
If your site is not showing after a few hours, the [domain and SSL troubleshooting guide](https://www.nijeesweb.com/docs/website/troubleshooting/domain-and-ssl) walks through every cause.
### Using a subdomain
You can run a NijeesWeb site on a subdomain such as `shop.yourbusiness.in`. Enter the subdomain as your website domain when you set up, then add the records with the subdomain as the name:
| Type | Name / Host | Value |
| --- | --- | --- |
| A | `shop` | `13.202.27.61` |
| A | `www.shop` | `13.202.27.61` |
### Common questions
#### Do I need to change my nameservers?
No. Keep your current nameservers and add the two `A` records. Changing nameservers can break your email and other services.
#### Will my email stop working?
No. Email uses `MX` records, which you do not touch.
#### My site shows "There's no website at this address"
That page means your domain already points to NijeesWeb, but no active website uses that exact domain. Check you typed the domain on the set-up page exactly as you are visiting it — see [Website offline](https://www.nijeesweb.com/docs/website/troubleshooting/website-offline).
#### Can I move my domain to another registrar later?
Yes. As long as the two `A` records point to `13.202.27.61`, your site keeps working wherever the domain is registered.
## Sign in to your website
Source: https://www.nijeesweb.com/docs/website/getting-started/first-sign-in
Every website has its own **admin panel** at its own domain. That is where you edit pages, upload pictures and change settings.
### Open the admin panel
1. Go to `https://yourdomain/admin` — for example `https://sharmadental.in/admin`.
2. You are taken to the **Sign in** page.
3. Enter the **admin email** and **admin password** you created on the [set-up page](https://www.nijeesweb.com/docs/website/getting-started/set-up-your-website).
4. Tick **Keep me signed in** on your own computer if you like.
5. Select **Sign in**. You land on your website's **Dashboard**.

You can also get there from your NijeesWeb account: on the [dashboard](https://www.nijeesweb.com/account/dashboard), every website card has a **Website admin** button.
> [!NOTE]
> Your **admin login** is not your **NijeesWeb account** login — unless you chose the same email and password for both. The account is for billing; the admin panel is for editing.
### Forgot your admin password?
1. On the sign-in page, select **Forgot password?**
2. Enter your admin email and select **Email me a reset link**.
3. Open the email (check your spam folder too) and follow the link.
4. Choose a new password of **at least 8 characters**, type it again, and select **Save new password**. You are signed straight in.
### "Too many login attempts"
After **5 wrong passwords**, sign-in for that email is paused for **15 minutes** to stop people guessing. The message tells you how many seconds are left. Wait, or reset your password instead.
### Signing out
At the bottom of the admin menu, select **Logout**. On a shared computer, always sign out when you finish.
### Can more than one person edit my website?
Each website has one admin login. Share it only with people you trust — anyone with the password can change or delete your content. To change the admin password, use **Forgot password?** to set a new one.
Next: take the [tour of the admin panel](https://www.nijeesweb.com/docs/website/getting-started/admin-tour).
## A tour of the admin panel
Source: https://www.nijeesweb.com/docs/website/getting-started/admin-tour
Your admin panel has a menu on the left and the screen you are working on to the right. On a small screen, the menu folds into icons — hover over an icon to see its name.

### Dashboard
The first screen after you sign in shows:
- **Your plan** — when it started, the **days left** and how much of the year is used, then **what your plan allows and how much you use**: pages, image galleries, video galleries and storage, and whether the mega menu is included, with any add-ons listed below. In the last 30 days a reminder appears; **Manage subscription** opens your NijeesWeb account in a new tab, where you renew, upgrade or buy add-ons.
- **Counts** of your pages, blog posts, blog categories, galleries, banners, testimonials, forms and form enquiries. Each card opens that section.
- **Recent Form Enquiries** — the latest messages from your website's forms.
- Shortcuts to **Manage Pages**, **Manage Blogs**, **Media**, **Settings** and **Visit Website**.
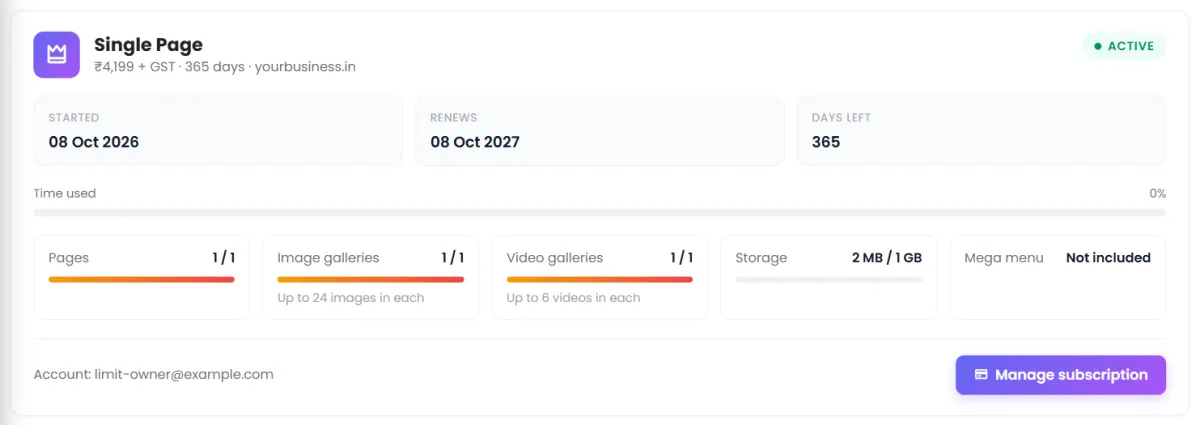
### The menu
| Menu | What it is for | Guide |
| --- | --- | --- |
| **Visit Website** | Opens your live site in a new tab. | — |
| **Dashboard** | The overview above. | — |
| **Info Pages** | Every page of your site. Add, reorder, open the builder, set page SEO. | [Pages](https://www.nijeesweb.com/docs/website/building-pages/pages) |
| **Media** › Image Gallery, Video Gallery, Banners, Media Library | Your pictures and videos, organised into galleries and banner sets. | [Media library](https://www.nijeesweb.com/docs/website/content/media-library) |
| **Testimonials** | Customer quotes to show on any page. | [Testimonials](https://www.nijeesweb.com/docs/website/content/testimonials) |
| **Accordions / FAQs** | Question-and-answer lists and expandable sections. | [Accordions](https://www.nijeesweb.com/docs/website/content/accordions) |
| **Blogs** › Blogs, Blog Categories | Articles, organised by category. | [Blog](https://www.nijeesweb.com/docs/website/content/blog) |
| **Forms** › Forms, Form Enquiries | Build forms; read what visitors send. | [Forms](https://www.nijeesweb.com/docs/website/content/forms) |
| **Layout** › Header Manager, Menu Links, Mega Menu, Footer Builder, Social Links | Everything around your pages. | [Header](https://www.nijeesweb.com/docs/website/header-footer/header) |
| **Design** › Theme, My Library, Website Themes, Theme Library, design styles, Import Designs | Colours, fonts, themes and ready-made styles. | [Theme](https://www.nijeesweb.com/docs/website/design/theme) |
| **Languages** › Languages & Detection, Translations | Publish in more than one language. | [Languages](https://www.nijeesweb.com/docs/website/languages/add-a-language) |
| **Settings** › General Settings, CSS & JS | Company details, logo, SEO defaults, business tools, custom code. | [General settings](https://www.nijeesweb.com/docs/website/settings/general-settings) |
| **Logout** | Sign out. | — |
### Saving, and never losing work
Every edit screen has a **save bar** fixed to the bottom of the window. It reads *All changes saved.* until you change something, then *Unsaved changes*, with two buttons:
- **Save changes** — or press Ctrl + S (⌘ + S on a Mac).
- **Discard** — or press Esc; you are asked to confirm first.
If you click a link or menu item with unsaved changes, a dialog asks what to do: **Save & leave** (Ctrl + S), **Yes, leave** (Y) to throw the changes away, or **No, stay here** (N). Closing the tab shows your browser's own *Leave site?* box instead.
> [!TIP]
> Keep a second tab open on your live site and refresh it after saving to see exactly what visitors see.
Next: work through the [launch checklist](https://www.nijeesweb.com/docs/website/getting-started/launch-checklist).
## Launch checklist
Source: https://www.nijeesweb.com/docs/website/getting-started/launch-checklist
Your website is live the moment it is created — but it is still showing the template's sample business. Work through this list before you share the address.
### Make it yours
- [ ] **Logo** — *Layout › Header Manager › Logo*: your logo in the header. → [Header](https://www.nijeesweb.com/docs/website/header-footer/header)
- [ ] **Favicon** — *Settings › General Settings*: the small icon browsers show in the tab. → [General settings](https://www.nijeesweb.com/docs/website/settings/general-settings)
- [ ] **Company details** — company name, address, phone, email. They appear in the header, footer and contact sections, and in the structured data Google reads.
- [ ] **Brand colours and fonts** — *Design › Theme*. Change them once; every page follows. → [Theme](https://www.nijeesweb.com/docs/website/design/theme)
- [ ] **Every page's words and pictures** — open each page in *Info Pages* and replace the sample text and images. → [The page builder](https://www.nijeesweb.com/docs/website/building-pages/page-builder)
- [ ] **Menu** — *Layout › Menu Links*: rename, remove or add items so they match your pages. → [Menu links](https://www.nijeesweb.com/docs/website/header-footer/menu-links)
- [ ] **Footer** — *Layout › Footer Builder*: your address, opening hours, quick links and copyright line. → [Footer](https://www.nijeesweb.com/docs/website/header-footer/footer)
- [ ] **Social profiles** — *Layout › Social Links*. → [Social links](https://www.nijeesweb.com/docs/website/header-footer/social-links)
### Make sure it works
- [ ] **Send yourself a test message** from your contact form, then check *Forms › Form Enquiries*. → [Form enquiries](https://www.nijeesweb.com/docs/website/content/form-enquiries)
- [ ] **Look at every page on your phone.** Fix anything cramped with the tablet and phone views in the builder. → [Tablet & phone](https://www.nijeesweb.com/docs/website/building-pages/responsive-design)
- [ ] **Click every link and button** in the menu, footer and pages.
- [ ] **Delete sample content you will not use** — demo blog posts, gallery images, testimonials.
- [ ] **Check the padlock** — your site should open at `https://` with no warning. If not, see [Domain & SSL](https://www.nijeesweb.com/docs/website/troubleshooting/domain-and-ssl).
### Help people find you
- [ ] **Site title and description** — *Settings › General Settings › Meta Title / Meta Description*: what Google shows under your name. → [Site-wide SEO](https://www.nijeesweb.com/docs/website/seo/site-wide-seo)
- [ ] **A title and description for each page** — the **SEO** button on each page in *Info Pages*. → [Page SEO](https://www.nijeesweb.com/docs/website/building-pages/page-seo)
- [ ] **Google Search Console** — verify your domain and submit your sitemap. → [Search Console](https://www.nijeesweb.com/docs/website/seo/google-search-console)
- [ ] **Bing Webmaster Tools** — this is also how ChatGPT search finds you. → [Bing and AI search](https://www.nijeesweb.com/docs/website/seo/bing-and-ai-search)
- [ ] **Google Analytics** — paste your measurement link to see visitors. → [Google Analytics](https://www.nijeesweb.com/docs/website/seo/google-analytics)
- [ ] **Google Business Profile** — add your new website address to your free business listing on Google Maps.
### Be ready for visitors
- [ ] **WhatsApp button** — let visitors message you in one tap. → [WhatsApp button](https://www.nijeesweb.com/docs/website/settings/whatsapp-button)
- [ ] **Cookie consent bar** if you use analytics or advertising cookies. → [Cookie consent](https://www.nijeesweb.com/docs/website/settings/cookie-consent)
- [ ] **Spam protection** on your forms. → [Spam protection](https://www.nijeesweb.com/docs/website/settings/spam-protection)
- [ ] **A privacy page** — if your forms collect names, emails or phone numbers, add a page explaining how you use them.
> [!TIP]
> Share your new site where your customers already are: your WhatsApp Business profile, Instagram bio, Google Business Profile and email signature.
---
# Website builder: Building pages
## Manage your pages
Source: https://www.nijeesweb.com/docs/website/building-pages/pages
Every page of your website — Home, About, Services, Contact — is listed under **Info Pages** in the admin menu.

### What each page row shows
- **⋮⋮ (drag handle)** — drag the row up or down to reorder pages.
- **Title** — the page's name.
- **Status** — **Active** (visible on your site) or **Inactive** (hidden). Click the pill to switch. **Off — plan limit** means your plan switched the page off because the website has more pages than it allows — see [over a limit](https://www.nijeesweb.com/docs/website/reference/limits-and-file-types#when-your-website-is-over-a-limit).
- **Home Page** — a badge instead of a status on the page visitors see first.
And the action icons, from left to right:
| Icon | Action |
| --- | --- |
| **Translate** | Translate this page. Only shown on multilingual sites — see [Translate your content](https://www.nijeesweb.com/docs/website/languages/translate-your-content). |
| **SEO** | The page's search title, description and keywords — see [Page SEO](https://www.nijeesweb.com/docs/website/building-pages/page-seo). |
| **Clone** | Make an exact copy of the page, to use as a starting point for a similar one. |
| **Edit** | The page's title, address (slug) and header placement. |
| **Builder** | Open the page in the [page builder](https://www.nijeesweb.com/docs/website/building-pages/page-builder), in a new tab. |
| **Delete** | Delete the page, after you confirm. |
### Your home page is the first page
The page at the **top of the list** is your home page — the one at `yourdomain/`. To make a different page the home page, **drag it to the top**.
The home page can't be made inactive or deleted, because your website always needs one.
### Add a page
Select **Add New** at the top right, then follow [Create a page](https://www.nijeesweb.com/docs/website/building-pages/create-a-page).
> [!NOTE]
> Above the list, a bar shows how many pages your plan allows and how many you have. When they are equal, **Add New** shows a lock: pressing it explains the limit. Delete or reuse a page you no longer need, add pages with an [add-on](https://www.nijeesweb.com/docs/website/account-billing/add-ons), or [upgrade your plan](https://www.nijeesweb.com/docs/website/account-billing/upgrade-your-plan). On a one-page plan, add sections to your page instead.

### Change a page's title or address
Select **Edit** on the page. You can change:
- **Title** — the name shown in the admin and, by default, in menus.
- **Slug** — the page's address: a slug of `about-us` makes the page `yourdomain/about-us`. Use lowercase words joined with hyphens.
- **Header** — *Start the content below the header* (usual), or *Let the header float over the content* for a page that opens on a full-width picture.
> [!WARNING]
> Changing a slug changes the page's address. Links to the old address — in your menu, on other sites, in Google — stop working. Update your [menu links](https://www.nijeesweb.com/docs/website/header-footer/menu-links) afterwards.
### Hide a page without deleting it
Click the **Active** pill to make the page **Inactive**. Visitors can no longer open it; everything in it is kept, and you can switch it back on at any time.
### Find a page
Type in **Search pages…** at the top. While a search is active the drag handles are hidden, so you can't reorder a filtered list by accident.
### Delete a page
Select **Delete** and confirm. Deleting is permanent. Remove the page from your menu too, so visitors don't follow a link to a missing page.
## Create a page
Source: https://www.nijeesweb.com/docs/website/building-pages/create-a-page
1. Go to **Info Pages** and select **Add New**.
2. Type a **Page title**, such as *About us*.
3. Choose how the page starts (below).
4. Select **Create & open builder**.

[Video: Creating a page: a title, a starting point, then Create & open builder](https://www.nijeesweb.com/marketing/video/create-a-page.mp4)
The page builder opens **in a new tab** with your new page, and this tab goes back to the pages list — so the new page is already in the list behind you.
### Four ways to start
| Option | What you get | Best for |
| --- | --- | --- |
| **Blank page** | An empty canvas. | Building something unique. |
| **From my library** | A copy of a section or page you saved earlier. | Repeating your own layouts. |
| **Premade page** | A complete page designed by NijeesWeb — every row filled with placeholder content. | A new kind of page in minutes. |
| **Premade section** | One designed section — a hero, a feature row, an FAQ block — to build on. | Starting with a strong first section. |
The premade pages and sections you see depend on your plan.
### Preview before you choose
Each item in the lists has an **eye icon** (*Live preview*). It opens the design in a new tab, exactly as it would look on your site, without creating anything. Close the tab and pick another until you find the right one.
### If the builder tab does not open
Your browser may have blocked the new tab as a pop-up. In that case the builder opens in the same tab instead — nothing is lost. To get the new-tab behaviour back, allow pop-ups for your website's address in your browser.
### After creating
- The page is **Active** straight away, but it is not in your menu yet. Add it in [Menu Links](https://www.nijeesweb.com/docs/website/header-footer/menu-links).
- Give it a search title and description with [Page SEO](https://www.nijeesweb.com/docs/website/building-pages/page-seo).
## The page builder
Source: https://www.nijeesweb.com/docs/website/building-pages/page-builder
The page builder is where you design a page. Open it from **Info Pages** with the **Builder** icon on any page — it opens in a new tab, showing the page much as visitors will see it.

[Video: Adding a row, then an element, then saving](https://www.nijeesweb.com/marketing/video/builder-basics.mp4)
### How a page is made: rows, columns, elements
- A **row** is a horizontal band across the page — a hero, a strip of features, a contact section. Rows stack from top to bottom.
- Each row is split into **columns** — between one and six, side by side. On phones, columns stack one under another.
- Each column holds **elements** — a heading, some text, an image, a button, a gallery, a form… — stacked top to bottom.
So: *page → rows → columns → elements*. Each level has its own toolbar and its own settings.
### The toolbars
Hover over any part of the page to see its toolbar:
| | Row (orange) | Column (yellow) | Element (teal) |
| --- | --- | --- | --- |
| **Move** by dragging | ✓ (the ✥ handle) | ✓ | ✓ |
| **Move** one step | ▲ up / ▼ down | ◀ left / ▶ right | ▲ up / ▼ down |
| **Settings** (⚙) | Row settings | Column settings | Element settings |
| **Copy** | Duplicate the row | Duplicate the column | Duplicate the element |
| **Delete** (🗑) | ✓ | ✓ | ✓ |
| Extra | 🔖 *Save this section to my library* | ➕ add a column | — |
### Add a row
1. Hover between two rows (or below the last one) and select the **+** that appears.
2. Choose **how many columns** the row starts with — 1 to 6. The tiles show the split.
3. The new row appears with empty columns, each showing a **+** to add an element.
You can add or remove columns later, and change their widths.
### Add an element
1. Select the **+** inside a column.
2. In *Add an element*, choose what to place: **Heading, Text, Blurb, Button, Single Image, Single Video, Banners, Image Gallery, Video Gallery, Testimonials, Form, Blogs** or **Accordion**.
3. The element's settings open straight away — fill in its content and select **Save changes**.
What each element does, and its options, is in [Elements](https://www.nijeesweb.com/docs/website/building-pages/elements).
### Move things around
- **Drag** a row, column or element by its move handle and drop it where you want it — even into another row or column.
- Or use the **arrow buttons** to move it one step at a time — handy on a laptop trackpad.
### Resize columns
Drag the **handle between two columns** to make one wider and the other narrower. In the phone preview the same handle sets the column's width **on phones only**.
You can also type an exact width — in *Column settings*, under **Width**.
### Edit settings
Select the ⚙ on a row, column or element to open its settings. Most settings windows have these tabs:
- **Content** *(elements only)* — what it shows: the words, the image, the gallery, the link.
- **Design** — spacing (padding and margin), width, the element's own look (fonts, colours, sizes), and the styling groups: backgrounds, borders, shadows, transforms, filters, animation and scroll effects. See [Advanced styling](https://www.nijeesweb.com/docs/website/building-pages/advanced-styling).
- **Advanced** — visibility per screen size, CSS class and ID, and on rows, custom CSS and JavaScript.
At the top of the **Design** tab is the **screen bar** — **Desktop**, **Tablet**, **Phone** and **Hover** — which decides which screen size (or the mouse-over state) you are editing. See [Tablet & phone](https://www.nijeesweb.com/docs/website/building-pages/responsive-design).
Select **Save changes** at the bottom to apply them to the page.
> [!TIP]
> The **Row settings** window also lists the row's columns, and **Column settings** lists the column's elements — each with a drag handle, arrows, edit and delete. It is the quickest way to rearrange a crowded row.
### Preview other screen sizes
Use the three icons at the bottom of the builder — **Desktop preview (full width)**, **Tablet preview (820px)** and **Phone preview (390px)** — to narrow the canvas and check how the page looks on smaller screens. Previewing changes nothing on the page.
### Save the page
Select **Save Page** (top right), **Save changes** in the bar along the bottom — they do the same thing — or press Ctrl + S (⌘ + S on a Mac). The bar says *Unsaved changes* until you do. Changes are live on your website as soon as the save completes — refresh your site's tab to see them.
> [!WARNING]
> Changes are **not** saved automatically. If you try to leave the builder with unsaved changes, you are asked whether to save first — but closing the browser tab only gets the browser's own warning. Save often.
### Library tools
At the bottom of the builder:
- **+ Add section** — browse ready-made sections from the NijeesWeb library and your own saved sections, and add one to the bottom of the page.
- **⤓ Save page to library** — save the whole page to *My Library*, so a new page can start from it.
More in [Save and reuse sections](https://www.nijeesweb.com/docs/website/building-pages/save-and-reuse-sections).
### Undoing a mistake
There is no undo button. If you delete something by accident, **leave without saving** (choose **Yes, leave** when asked) and reopen the builder — the page is exactly as it was at your last save.
## Elements reference
Source: https://www.nijeesweb.com/docs/website/building-pages/elements
Add an element with the **+** inside any column. Each element's settings have a **Content** tab (what it shows), a **Design** tab (how it looks, including backgrounds, borders, animation and more — see [Advanced styling](https://www.nijeesweb.com/docs/website/building-pages/advanced-styling)) and an **Advanced** tab (which screen sizes show it, and its CSS class and ID).
### Text
#### Heading
A title, from **H1** (biggest, one per page) to **H6**.
- **Content:** the heading text.
- **Design:** alignment, size level (H1–H6), font size and unit (px, rem, em), weight, font family (or *Default Site Font*) and colour.
> [!TIP]
> Use one **H1** per page — usually the main title at the top — then H2 for sections and H3 for points within them. Search engines and screen readers rely on this order.
#### Text
Formatted paragraphs, made with a word-processor-style editor: bold, italic, links, lists, headings and alignment.
#### Blurb
A small "feature" block: an **icon or an image**, a short **title** and a line or two of **text** — perfect for "Free delivery", "24×7 support" and similar.
- **Content:** choose **Icon** (search the built-in icon set), **Image** (from the media library — a transparent PNG works well) or **None**; then the **Words** and **Text** (line breaks are kept).
- **Link:** *No link*, *A page on this site* or *A web address*. When linked, the whole blurb becomes one link, with no underline anywhere on it.
- **Design (Blurb Design):** layout and icon position (*beside the words*, *level with the title*, *centred*), the gap, icon size and colour, the shape behind it, title and text fonts, and colours *When pointed at* (hover).
### Actions
#### Button
- **Content:** **Button Text**, **Button Link** — *External Link* (any web address) or *Another Page On Website* — and **Open Link In** a *New Window* or the *Same Window*.
- **Design:** use a saved **button design** from the design library, or style it here: alignment, font size, weight and family, border radius and border, colours (normal and hover), padding, letter spacing, text transform (UPPERCASE, lowercase, Capitalize) and box shadow.
### Pictures and video
#### Single Image
- **Content:** **Image** — upload one or *Select from Media Folder*; **Alt text** describing what the picture shows (important for Google and for blind visitors).
- **Design:** alignment, border radius and width.
#### Single Video
- **Content:** **Where the video comes from** — *A file from your media library* (pick one or upload a clip) or *YouTube, Vimeo or another link* (paste a normal link; it is converted for you). Both are remembered, so switching back keeps the other. Add an optional **Caption**.
- **Design:** size and placement (alignment, shape, maximum width, fit and crop), frame (corner radius, border, shadow), playback for uploaded files (**Autoplay** — forces mute, **Loop**, **Start muted**, **Show controls**, **Play inline on phones**, **Preload**), a **Poster image**, picture treatment (opacity, brightness, contrast, saturation, blur, greyscale, zoom and shadow on hover), a play **icon over the video**, and **Show caption** with its placement and style.
> [!NOTE]
> For YouTube and Vimeo links the playback settings don't apply — the video site controls playback.
#### Banners
A full-width slider from one of your banner sets.
- **Content:** **Select Banner Gallery**, and **Banner Image Border Radius** (for example `20px`).
- Create banner sets under *Media › Banners* — see [Banners](https://www.nijeesweb.com/docs/website/content/banners).
#### Image Gallery
- **Content:** **Select Image Gallery** — one gallery, or *All Galleries* to show your galleries as a list; a limit on how many to show; border radius; **Display Gallery Title**.
- **Design:** a saved gallery design from the design library (grid or carousel, gaps, shapes).
- Visitors can open any picture full screen. Create galleries under *Media › Image Gallery* — see [Image galleries](https://www.nijeesweb.com/docs/website/content/image-galleries).
#### Video Gallery
The same as Image Gallery, for videos — plus **Autoplay Video**. See [Video galleries](https://www.nijeesweb.com/docs/website/content/video-galleries).
### Content from your libraries
#### Testimonials
Customer quotes from *Testimonials*.
- **Content:** **Limit the number of items visible** — *No limit* or *Apply limit* and a number.
- **Design:** follow the site's testimonial design, or pick a saved testimonial design; then name and quote fonts, sizes and colours.
#### Form
- **Content:** **Select Form** — any form you built under *Forms*.
- **Design:** a saved form design, or input and label colours, borders, radius, fonts and padding, plus the **Submit button**'s text, colours and padding.
- Every submission arrives in *Forms › Form Enquiries*. See [Forms](https://www.nijeesweb.com/docs/website/content/forms).
#### Blogs
A list of posts.
- **Content:** **Select Categories** — pick one or more categories to list their posts, or *List Blog Categories* to show category cards instead.
- **Design:** a saved blog design, or card settings: background, gap, border, shadow, hover effect (*Zoom* or *Shadow*), corner radius, padding, image corners, title size and length (*Full Title* or *Truncate After* a number of characters), and whether to show the **Publisher Name**, **Publish Date** and **Content / Excerpt**.
#### Accordion
Expandable questions and answers — ideal for FAQs.
- **Content:** **Select Accordion**. Its items are managed under *Accordions / FAQs*; the same accordion can be placed on several pages.
- **Design:** pick a saved accordion design — the full designer lives under *Design › Accordion*.
### Every element also has
- **Visibility** — hide it on desktop, tablet or phone. See [Tablet & phone](https://www.nijeesweb.com/docs/website/building-pages/responsive-design).
- **CSS class and ID** — for custom CSS.
- **Advanced styling** — background, border, shadow, transform, filters, animation, transitions, position and scroll effects. See [Advanced styling](https://www.nijeesweb.com/docs/website/building-pages/advanced-styling).
## Tablet and phone design
Source: https://www.nijeesweb.com/docs/website/building-pages/responsive-design
Most of your visitors will arrive on a phone. NijeesWeb pages adapt to small screens on their own — columns stack, text wraps — and you can fine-tune each screen size without designing the page twice.
### The idea: design once, adjust where needed
You design the **desktop** version. The **tablet** and **phone** versions start as copies of it — every setting reads *Same as desktop* — and you only change the few things that need changing on a smaller screen, such as smaller padding or a smaller heading. Everything you leave alone keeps following desktop, so later desktop changes flow through automatically.
### 1. Preview the page on smaller screens
At the bottom of the builder, use the three icons:
| Icon | Preview width |
| --- | --- |
| 🖥 Desktop | full width |
| ▭ Tablet | 820 px |
| 📱 Phone | 390 px |
The canvas narrows to that width so you see the page as a tablet or phone would. Previewing never changes the page.

### 2. Change a setting for one screen size
1. Open the settings (⚙) of a row, column or element.
2. On the **Design** tab, in the **screen bar** at the top, choose **Tablet** or **Phone**. The bar reminds you: *Options left on "Same as desktop" inherit the desktop styling.*
3. Find the setting to change — padding, for example — and switch its **Style** from *Same As Big Screen* to **Custom**.
4. Enter the value for this screen size and select **Save changes**.
Back on desktop nothing has changed; only the screen size you chose uses the new value.
To start over on a screen size, select **Reset All** in the screen bar.
### 3. Hide something on phones (or desktop)
Every row, column and element has **Visibility** on the **Advanced** tab of its settings, with three switches:
- **Desktop** — 1025 px and up
- **Tablet** — 768 px to 1024 px
- **Phone** — up to 767 px
Clear a switch to hide the item on that screen size. It is removed from the page there, not just made invisible — so it costs no loading time.
> [!TIP]
> A common pattern: a wide hero picture on desktop, and a different, taller row for phones — each hidden on the other's screen size.
In the builder, a hidden item is shown **dimmed with a dashed outline** in that preview, so you can still reach it to switch it back on.
### 4. Column widths on phones
On phones, columns **stack** one under another at full width. To keep two small columns side by side on phones instead (two icons, say), switch to the **Phone** preview and drag the handle between the columns: it sets their width on phones only.
### Header and footer on phones
Your header turns into a menu button on smaller screens, with its own phone menu. Its sizes and spacing for tablet and phone are set in the *Header Manager* — see [Header](https://www.nijeesweb.com/docs/website/header-footer/header).
### Checklist for every page
- Open the **Phone** preview and scroll the whole page.
- Is any text too big, or squeezed into a narrow column?
- Is padding so large that a section is mostly empty space? Reduce it for phones.
- Are buttons easy to tap, and not too close together?
- Then check on a real phone too — nothing replaces it.
## Advanced styling and animation
Source: https://www.nijeesweb.com/docs/website/building-pages/advanced-styling
Every row, column and element has the controls a professional designer would use on the **Design** tab of its settings (select its ⚙) — no code needed. The **screen bar** at the top of the tab decides what you are editing: **Desktop**, **Tablet**, **Phone**, or the **Hover** state. Each group can be set separately for each.

### Hover styling
Select **Hover** in the screen bar, then switch on **Enable Hover Styling** in a group. Now that group can have different values while the mouse is over the item — a darker background, a lifted card, a bigger shadow. *Off means the hover state simply reuses the default styling.*
The **Transitions** group decides how smoothly it changes: **Transition Duration**, **Transition Delay** and **Transition Speed Curve**.
### Background
Choose the background type:
- **Colour** — any colour, including see-through.
- **Gradient** — **Linear**, **Radial** or **Conic**, with a direction or position and as many **colour stops** as you like.
- **Image** — with **size** (*Cover*, *Fit*, *Actual*, or a custom size), **position**, **repeat**, and **attachment** (*Scroll*, *Fixed*, *Local*). Switch on **Parallax Effect** for the picture to move more slowly than the page as visitors scroll.
- **Video** — an MP4 (and optionally WEBM) file playing behind the content, with a **Poster Image**, fit, position, playback speed, autoplay, loop, muted, **Pause When Off-screen** and a fallback colour.
Then, on top of any background:
- **Tint** — a colour wash over the picture, with a blend mode and strength.
- **Overlay** — a colour or gradient layer with its own opacity, to make white text readable on a busy photo.
> [!TIP]
> Text over a photo? Add an **Overlay** of black at 40–60 % opacity. It makes the text readable on every screen without editing the photo.
### Border
**Rounded Corners** (each corner separately or all at once, with **Clip Children To Corners** to round the contents too), **Border Width** (each side, or *Same Style On All Sides*), **Border Style** and **Border Colour**.
### Box Shadow
**Horizontal Position**, **Vertical Position**, **Blur Strength**, **Spread Strength**, **Shadow Colour** and **Shadow Position** — *Outer* (a drop shadow) or *Inner* (pressed in).
### Transform
Move, turn and resize an item without changing the layout around it: **Scale** (X and Y, linked or not), **Move** horizontally and vertically, **Rotate** (tilt, turn, spin), **Skew**, the **Origin** point it turns around, and **Perspective** for 3D. Use it with **Hover** for effects like "lift up slightly when pointed at".
### Filters
Change how an item looks — great for photos: **Hue**, **Saturation**, **Brightness**, **Contrast**, **Invert**, **Sepia**, **Greyscale**, **Opacity**, **Blur** and **Blend Mode**. With **Hover**, a black-and-white photo can turn to colour when pointed at.
### Animation
An entrance animation that *plays once as the element scrolls into view*:
- **Animation Style** — None, Fade, Slide, Bounce, Zoom, Flip, Fold or Roll.
- **Animation Direction**, **Duration**, **Delay**, **Intensity**, **Starting Opacity**, **Speed Curve**.
- **Animation Repeat** — *Once* or *Loop*.
> [!TIP]
> Give items in the same row the same animation with delays of 0, 0.1 and 0.2 seconds — they arrive one after another, which looks deliberate and premium. Keep durations under a second.
### Position
**Default**, **Relative**, **Absolute** or **Fixed**, with a 9-point **Location**, **Vertical** and **Horizontal Offset**, and a **Z Index** to decide what sits on top. Useful for a badge overlapping a picture, or a floating shape.
**Sticky Position** keeps an item in view while its row scrolls past: *Stick To Top*, *Stick To Bottom* or both, with an offset.
### Scroll effects
Effects that follow the visitor's scrolling, from when the item enters at the bottom of the screen to when it leaves at the top:
- **Vertical Motion** and **Horizontal Motion** — parallax-style movement.
- **Fading In And Out**, **Scaling Up And Down**, **Rotating** and **Blur**.
Each has a **Starting**, **Mid** and **Ending** value and a range (*Range Start* and *Range End*, in % of the screen). **Motion Effect Trigger** sets which part of the item counts — top, middle or bottom — and **Enable On Mobile** decides whether phones get the effect too.
### CSS classes, IDs and custom CSS
These live on the **Advanced** tab, next to **Visibility** (which screen sizes show the item at all — see [Tablet & phone](https://www.nijeesweb.com/docs/website/building-pages/responsive-design)):
- **Css Class** and **Css ID** *(rows, columns and elements)* — names for your own CSS, or an ID to link to (`/about#team`).
- **Custom CSS** *(rows only)* — rules that apply to this row and what is inside it; they cannot leak to the rest of the page.
- **Custom JS** *(rows only)* — a script that runs once on the live site with `el` set to the row. It does not run in the editor.
To style a single column or element with your own CSS, give it a **Css Class** and write the rule in the row's **Custom CSS**, or site-wide in [Custom CSS & JavaScript](https://www.nijeesweb.com/docs/website/design/custom-css-and-javascript).
### Keep it fast and calm
Animation is seasoning, not the meal:
- Animate a few important things, not everything.
- Prefer **Fade** and small **Slide** distances.
- Video backgrounds are heavy on phones — consider hiding the video row on phones and showing a photo instead.
- Visitors who have asked their device for reduced motion see your site without movement.
## Save and reuse sections
Source: https://www.nijeesweb.com/docs/website/building-pages/save-and-reuse-sections
Designed a section you love — a hero, a pricing strip, a team row? Save it once and drop it into any page in seconds.
### Save a section to My Library
1. In the page builder, hover over the row.
2. Select **🔖 Save this section to my library** in its orange toolbar.
3. Give it a name you will recognise, and confirm.
### Save a whole page
At the bottom of the builder, select **⤓ Save page to library**. The page is kept in My Library, and [new pages](https://www.nijeesweb.com/docs/website/building-pages/create-a-page) can start from it with **From my library**.
### Add a section to a page
1. At the bottom of the builder, select **+ Add section**.
2. Choose where to look:
- **Import** — the NijeesWeb library, organised in **Themes**, **Pages** and **Sections**. What you see depends on your plan.
- **My library** — everything you have saved or imported.
3. Use the **eye** icon (*Live preview*) to look before you add.
4. Select **Add**. The section is added to the **bottom** of the page — drag it to where you want it.
From a theme, you can take a whole page (**Add the whole page**), one section from it (**Or take one section**), or every section at once (**Add all**).

### Manage My Library
Open **Design › My Library** to see everything you have saved or imported: sections, pages, themes, designs and mega menus. From there:
- **Add to page…** — put an item onto any page.
- **Remove** — delete it from your library (pages already using it are not affected).
> [!NOTE]
> Items in My Library belong to your website. They stay available even if you change plan, and even if the original is later removed from the NijeesWeb library.
### Good to know
- Adding a section **copies** it into the page. Editing it on one page does not change it anywhere else.
- Sections bring their own styling and images with them, so they look right the moment they arrive. Your site's [theme](https://www.nijeesweb.com/docs/website/design/theme) colours and fonts still apply.
## Page SEO — titles and descriptions
Source: https://www.nijeesweb.com/docs/website/building-pages/page-seo
When your page appears in Google, Bing or an AI answer, two things represent it: the **title** (the blue link) and the **description** (the grey lines under it). Page SEO lets you write both for each page.
### Edit a page's SEO
1. Go to **Info Pages**.
2. Select the **SEO** icon (🌐) on the page.
3. Fill in **Page SEO Settings**:
- **Title** — the page's name in search results and the browser tab.
- **Description** — one or two sentences shown under the title.
- **Keywords** — the search phrases the page is about, separated by commas. (Google ignores this field, but other systems may read it; it also keeps you focused.)
- **Custom Meta Tags** — extra `` tags for this page only, such as a verification tag a service asks you to add.
4. Save.

### Writing a good title
- **50–60 characters** — longer titles are cut off.
- Put the important words **first**: `Dental Implants in Pune | Sharma Dental` beats `Welcome to Sharma Dental — Implants`.
- Make every page's title **different**.
- Include your **location** if you serve a city: people search "bakery in Indore", not just "bakery".
### Writing a good description
- **120–155 characters**.
- Say what the page offers and why to click: *"Painless dental implants by specialists with 20 years' experience. Same-week appointments in Kothrud. Book online or call."*
- Write for people, not robots. Google may use your text, or pick a sentence from the page.
> [!TIP]
> AI assistants read the page itself, not just these tags. A clear first paragraph that says who you are, what you do and where — in plain words — is the single most useful thing for both Google and AI answers. See [How SEO works](https://www.nijeesweb.com/docs/website/seo/how-seo-works).
### If you leave the fields empty
The page still gets a sensible title — your site's **Meta Title** followed by the page's own title, such as *Sharma Dental | About us* — and your [site-wide description](https://www.nijeesweb.com/docs/website/seo/site-wide-seo). Fill them in for your most important pages first: home, your main services, contact.
### Blog posts
Each blog post has its own SEO settings in the same format — see [Blog](https://www.nijeesweb.com/docs/website/content/blog).
---
# Website builder: Design & themes
## Theme — your colours, fonts and shapes
Source: https://www.nijeesweb.com/docs/website/design/theme
**Design › Theme** is where your website's look is defined: colours, fonts, corner shapes, shadows and the default button. Every page, element and design that "follows the site theme" uses these values — so changing your brand colour here changes it everywhere at once.

### The groups
| Group | What it controls |
| --- | --- |
| **Brand colours** | **Primary** (your main brand colour — buttons, links, highlights) and its hover colour; **Secondary**; **Accent**; and the text colour that sits on each (*On primary*, *On secondary*, *On accent*). |
| **Surfaces & text** | **Page background**, **Surface / cards**, **Alt surface** (for alternating sections), **Body text**, **Muted text**, **Headings**, **Borders**. |
| **Status colours** | **Success**, **Danger**, **Warning**, **Info** — used for messages, such as a form's thank-you note. |
| **Typography** | **Body font**, **Heading font**, **Base size** and **Line height**. |
| **Shape & depth** | Corner **Radius** (small, medium, large) and **Shadow** (small, medium). |
| **Buttons** | The site button: background and text (normal and hover), border, corner radius, font size and weight, letter spacing, text transform, padding, shadow and transition. |
The **Live preview** on the right updates as you type — headings, body text, a link, every button style and a card — so you see the result before saving.
### Change your brand colour
1. Open **Design › Theme**.
2. Under **Brand colours**, click the **Primary** swatch and pick your colour, or type its hex code (for example `#1F6FEB`).
3. Set **On primary (text)** to a colour that reads well on it — usually white for dark brand colours, or near-black for light ones.
4. Check the preview, then save.
> [!TIP]
> Make sure text is readable: dark text on light colours, white text on dark ones. If you cannot comfortably read a button's label from arm's length, change the *On primary* colour.
### Fonts
**Body font** and **Heading font** accept a font name; the suggestions list offers well-tested choices such as Poppins, Inter, Roboto, Montserrat, Raleway and Lato. Two fonts are plenty — one for headings, one for everything else. More on fonts in [Fonts](https://www.nijeesweb.com/docs/website/design/fonts).
### Reset
- The ↺ next to any value resets just that value.
- **Reset to defaults** resets every value, after you confirm.
### What does *not* follow the theme
Elements you styled by hand in the page builder keep their own values. In element settings, options such as *Saved button design* or *the site design* follow the theme; values typed in the element's own Design tab override it.
## Install a website theme
Source: https://www.nijeesweb.com/docs/website/design/website-themes
**Design › Website Themes** shows complete ready-made websites from the NijeesWeb library — the ones your plan includes. You can install a whole theme, or pick single pieces from it.

> [!NOTE]
> The list shows only the themes your plan includes. If it says *No website themes are available on your plan yet*, none have been published for your plan so far. Your starter website is still yours to change completely, and new themes appear here as they are added.
### Preview a theme
Select **Live demo** on a theme to open it, exactly as it would look, in a new tab.
### Install the complete website
Select **Install complete website**. This:
- applies the theme's **colours** (your [Theme](https://www.nijeesweb.com/docs/website/design/theme) settings),
- replaces your **header** and **footer** with the theme's,
- **adds** the theme's pages to your site.
**Your existing pages are kept** — nothing is deleted. When it finishes you are asked whether to open the new pages in the builder.
> [!WARNING]
> Installing replaces your current colours, header and footer. If you have customised them, note your settings first (or save your header and footer designs) so you can switch back.
### Take just one piece
Under each theme you can apply pieces separately:
- **Design system → 🎨 Color theme** — **Apply** to take only its colours and fonts.
- **🔝 Header** — **Apply** to take only its header.
- **🔻 Footer** — **Apply** to take only its footer.
- **Pages** — **Add page** next to any page to add just that one.
- **Sections** — add them from the page builder with **+ Add section**, see [Save and reuse sections](https://www.nijeesweb.com/docs/website/building-pages/save-and-reuse-sections).
### "No website themes are available on your plan yet."
Themes are released per plan. If none are listed, your plan has none yet — your starter website is still fully editable, and higher plans may include more themes.
## The design library
Source: https://www.nijeesweb.com/docs/website/design/design-library
Elements such as buttons, forms and galleries can look many different ways. The **design library** keeps each look as a reusable **design**: style it once, then pick it for any element — and change every element using it from one place.
### The design screens
Under **Design** in the admin menu:
| Screen | Designs for |
| --- | --- |
| **Button** | Buttons — colours, type, spacing, border, shadow, icon and hover effect. |
| **Form** | Forms — fields, labels and the submit button. |
| **Accordion** | Accordions and FAQs — headers, panels, icons and animation. |
| **Image Gallery** / **Video Gallery** | Galleries — grid or carousel, gaps, shapes and captions. |
| **Testimonial** | Testimonial cards — layout, quote and name styles. |
| **Blog** | Blog post lists — cards, image, title, date and excerpt. |
### Create a design
1. Open the screen, for example **Design › Button**, and start a new design.
2. Give it a **Title** you will recognise, such as *Bold Indigo*.
3. Set its properties. The live preview updates as you go — for buttons, *hover, press or tab to it to try the design*.
4. Leave any field **blank to inherit that property from your theme**.
5. Select **Create design**.

### Make it the site default
Switch on **Make this my site button** (or form, accordion…). Every element set to follow *the site design* now uses it. On the default design itself you'll see: *This is your site button. Changes here restyle every button that follows the site theme.*
### Use a design on one element
In the page builder, open an element's **Design** tab and choose it under **Saved … design** — for example *Saved button design*.
### Import designs from NijeesWeb
- **Design › Import Designs** — ready-made button, form, accordion, gallery, testimonial, blog, header and footer designs included with your plan. Select **View details** to preview, then import.
- **Design › Theme Library** — complete design themes (colours plus matching designs).
Imported designs are copied into your site; they stay yours even if your plan changes.
> [!NOTE]
> *"Your website has no active plan, so no designs are on offer."* appears when the website's plan has expired — renew to see the library again.
## Fonts
Source: https://www.nijeesweb.com/docs/website/design/fonts
Good typography is most of what makes a website look professional. NijeesWeb gives you three levels of control.
### 1. The site font
**Settings › General Settings › Site Font Family** — the font used across the site unless something else is chosen. Pick from the list.
### 2. Body and heading fonts in Theme
**Design › Theme › Typography** sets the **Body font** and the **Heading font**, plus the **Base size** and **Line height**. Choose from the suggested fonts. See [Theme](https://www.nijeesweb.com/docs/website/design/theme).
### 3. A font for one element
Headings, buttons, forms, blurbs and blog lists have their own **Font Family** in their **Design** tab, with *Default Site Font* as the first option.
### Only the fonts you use are loaded
Your website loads only the font families it actually uses. That keeps pages fast, so you don't have to worry about picking too many — but for a calm, premium look, two families are plenty: one for headings, one for text.
### Hindi, Tamil and other scripts
Phones and computers already include good fonts for Devanagari, Tamil, Bengali and other Indian scripts, and use them automatically for text in those languages. Your Latin-script font is used for English words alongside.
### Any other web font
With **Settings › CSS & JS** you can load any web font your licence allows — from Google Fonts or from your font provider — and apply it with CSS. See [Custom CSS & JavaScript](https://www.nijeesweb.com/docs/website/design/custom-css-and-javascript).
```css
@import url('https://fonts.googleapis.com/css2?family=Marcellus&display=swap');
h1, h2, h3 { font-family: 'Marcellus', Georgia, serif; }
```
Put the `@import` line at the very top of your CSS, before any other rule.
> [!WARNING]
> Every extra font family makes pages a little slower to load, especially on phones. Use one, at most two, beyond your theme fonts — and check the font's licence allows website use.
## Custom CSS & JavaScript
Source: https://www.nijeesweb.com/docs/website/design/custom-css-and-javascript
The visual controls cover almost everything. When you need more — a special effect, a third-party widget, a tracking pixel — you can write code.
### Site-wide CSS and JavaScript
**Settings › CSS & JS** opens two code editors:
- **CSS** (`styles.css`) — styles applied to every page.
- **JS** (`script.js`) — JavaScript that runs on every page.
Write your code and save. It is live on your site straight away.

#### Common uses
- **A tracking pixel** (Meta, LinkedIn, Google Ads) — paste the script's JavaScript (without the `